ABS Systems
In terms of numbers of systems in use or popularity the Bosch 2U system ranks in the lower half of ABS systems. The Bosch 2U system was used on the following vehicles:
Chevrolet
1991-96 Caprice (B-Body)
Buick
1991-96 Roadmaster (B-Body)
The system is classified as a non-integral three-channel system. Non-integral is sometimes referred to as an "add on system." This implies the system is added to a conventional base brake system. The easiest method to identify the difference between a non-integral and integral system is to look at the master cylinder. If the vehicle is equipped with a conventional master cylinder and vacuum booster, it is a non-integral. Most ABS systems are of this type.
Like most systems, the Bosch 2U is a three-channel system. Each front wheel has its own channel while the rears share a common channel.
There are only minor system variations among the vehicles that use the Bosch 2U system. They are required because the system is used on both front-to-rear split hydraulic systems (B- & D-Body) and diagonal-split hydraulic systems (E- & K-Body). The first of these differences was already mentioned, the four outlets used on the E- & K-Bodies due to the diagonal-spilt hydraulic system. The B- and D-Body only use three outlets. The second difference in the systems is the number of speed sensors used. The RWD B- and D-Bodies use three sensors while the FWD E- and K-Bodies use four due to the non-drive rear wheels.
The difference between RWD and FWD also determines the type of speed sensor used. RWD models use discrete sensors, front and rear, while the FWD models use integral sensors. The only other significant difference in the systems is the location of the EBCM. The locations are:
B-Body (up to 1993) — Above convenience center on the driver side instrument panel; and
B-Body (1994-96) — Attached to front of hydraulic control unit or BCM.
One consistency from model to model is the location of the hydraulic control unit or BCM. On all models it is mounted ahead of driver-side front wheelhouse. This location makes it more technician friendly than many other systems.
Like other systems, the Bosch 2U system will perform a self-check when the vehicle is first started. At startup the EBCM will check:
•Itself;
•Battery voltage;
•Wheel speed sensor
circuits;
•Fluid level switch; and
•Pressure differential
switch.
If the system detects no faults, it turns the amber ABS warning light off after about three seconds and readies the system for an ABS situation. The system further checks itself the first time the vehicle passes 3.6 mph. At this time the system performs what is called the "BITE" test. "BITE" stands for Built-In Test Equipment. The BITE test is designed to test the ABS outputs to verify normal operation. The BITE test will check the following:
•Wheel-speed sensors;
•Pump motor;
•Valve solenoids;
•Relay
power;
•Pump relay; and
•Battery voltage.
If a fault is detected during either the startup tests or the BITE test the system will:
•Store a code (most faults);
•Disable the ABS; and
•Turn the ABS
light on.
The ABS system will remain disabled until the problem is corrected or for the rest of the current ignition cycle if the fault goes away (intermittent). It should be noted on these systems a low-voltage problem will disable the ABS system and turn the ABS light on, but will NOT store a code.
Basic system operation is the same as all other ABS systems. Wheel speed is monitored by the EBCM for impending lockup once the driver applies the brake. Like other systems, the Bosch 2U uses brake switch input to determine if the brakes are being used. If one or more of the wheel-speed sensors indicate an impending lockup, the EBCM will "pump" that wheel to prevent it from happening.
The method used to pump the brakes is usually the biggest difference between the various ABS systems in use. The typical modulator usually uses two solenoid valves per wheel to control wheel lockup. One is used to isolate the wheel, while the other is used to release the pressure trapped in that wheel circuit.
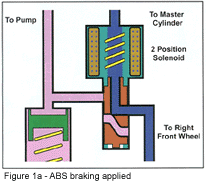
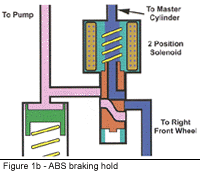
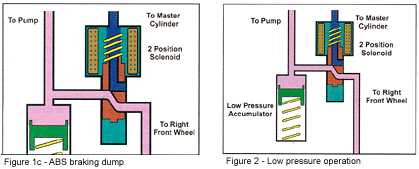
Most Bosch system utilizes a modulator that requires only one solenoid valve per wheel. This unique modulator is able to place each wheel’s solenoid valve in two different positions by varying the current supplied to the solenoid electromagnet. Figures 1a, 1b and 1c show schematics of one of these solenoid valves in its different locations.
Figure 1a is the position the valve spends most of its time at which is the brake released and non-ABS braking mode. In this position fluid travels through the solenoid unrestricted. Figure 1b shows the Pressure Hold Mode. The EBCM energizes the solenoid electromagnet with 2.5 amps. This amount of current pulls the solenoid plunger into a midway position that isolates the wheel from the rest of the system.
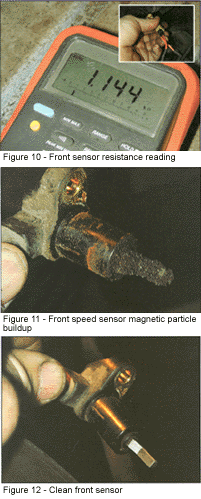
Figure 1c shows the solenoid in its Pressure Decrease Mode. The EBCM sends five amps to the electromagnet, which pulls the solenoid plunger further into the magnetic field, which opens the wheel circuit to the low pressure accumulator circuit allowing the wheel to release.
The low-pressure accumulator is a temporary storage vessel for the fluid released from the wheel circuits (See Figure 2). An electric motor drives a pump which pumps the fluid stored in the systems two low-pressure accumulators back to the master cylinder. The electric pump will run during the entire ABS stop cycle. The low-pressure accumulators are necessary to allow the pump to get up to speed. The pumping of the fluid back to the master cylinder will cause the pedal to rise slightly.
Once the pressure at the wheel is released and the speed sensor tells the EBCM wheel speed has increased, the cycle will start over. The Bosch 2U system is capable of performing the apply, hold, release process from four to 10 times in one second. It should be noted that there is no additional pressure supplied by the modulator to re-apply the brake during an ABS stop like in other systems. The driver’s foot pressure is the only source of pressurized fluid.
Being armed with a basic understanding of the Bosch 2U system is the first step to successful diagnosis and service. We will take this knowledge and apply it to a specific vehicle that is equipped with this system.
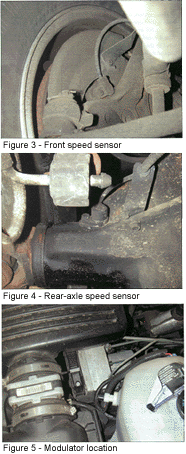
The vehicle we will use for this example is a 1996 Buick Roadmaster. This was the last year the Bosch 2U system was used. Since this a RWD B-Body, it is equipped with three wheel speed sensors. Figures 3 and 4 show the front and rear speed sensor locations.
The modulator on the 1996 Roadmaster is slightly different than those previously discussed. This version of the Bosch 2U system attaches the EBCM to the BCM as shown in Figure 5. Unlike the Kelsey Hayes 4WAL system, the Bosch system allows the EBCM to be replaced as a separate part. This will be discussed in detail later. The only other components in the system are the ABS warning light, wiring harness and fused power. This is really a simple system.
Before we discuss the diagnosis of the Roadmaster, let’s talk about the older, more typical Bosch 2U systems. Systems up to 1994 allowed both flashout access and scan tool access to diagnostic codes. The 1995-96 models require the use of a scan tool to access codes. Before we discuss accessing the codes, we have to take a step back. The diagnosis of the Bosch 2U system starts with a pre-diagnostic inspection. The steps include checking the following:
•Fluid level;
•Fluid leaks;
•Fuses;
•Parking brake operation;
and
•Component connections.
If these items check out, a warning lamp check is performed. If the ABS warning lamp comes on steady, either during startup or a test drive, it is time to check for codes. To access codes without a scan tool on early model systems, refer to the following service guidelines.
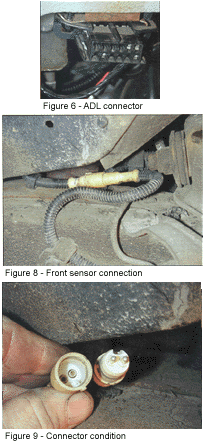
With the ignition "OFF," ground DCL terminals H to A, or jumper terminal H to a good body ground (See Figure 6). (This places the ECBM in what is referred to as "Diagnostic Mode.")
Turn the ignition "ON" and count the flashes of the amber ABS warning light.
The system will flash a two-digit code. The first code flashed should be code 12 (normal system). Code 12 will flash three times. After the third time the lamp will pause for three seconds and then start flashing the diagnostic trouble codes. Each code will flash three times before moving on to the next code. Once all codes have been displayed, code 12 will be flashed again. The Bosch 2U system can store up to three codes at a time. It should be noted that flashout access of codes cannot be used to access codes 41, 45, 55, 61 or 63. See the code chart in Figure 7 for a description of these codes.
The procedure used to access the diagnostic trouble codes with a scan tool will vary depending on the scan tool used. The basic procedure involves selecting the correct adapter for the DLC and entering the correct VIN information. Follow the scan tool prompts to read the codes. The GM B-Body Bosch 2U system codes are shown in Figure 7.
Figure 7:
Code, Description and Indication
21 — Right front wheel-speed sensor fault. Circuit or sensor problem with ignition "ON" and vehicle in motion.
22 — Right front toothed wheel frequency error — Circuit or sensor problem with ignition "ON" and vehicle in motion.
25 — Left front wheel-speed sensor fault — Circuit or sensor problem with ignition "ON" and vehicle in motion.
26 — Left front toothed wheel frequency error — Circuit or sensor problem with ignition "ON" and vehicle in motion.
35 — Rear axle speed sensor fault — Circuit or sensor problem with ignition "ON" and vehicle in motion.
36 — Rear axle toothed wheel frequency error — Circuit or sensor problem with ignition "ON" and vehicle in motion.
41 — Right front valve solenoid fault — Solenoid position not as commanded.
45 — Left front valve solenoid fault — Solenoid position not as commanded.
55 — Rear valve solenoid fault — Solenoid position not as commanded.
61 — Motor pump circuit fault — Voltage at relay without EBCM command or voltage not at relay within 60 milliseconds of command.
63 — Solenoid valve relay fault — Voltage at relay not correct as commanded.
71 — Electronic brake control module (EBCM) fault — Internal problem detected in self testing.
72 — Serial data link fault — Three consecutive data link transmission errors.
As you can see, six of the 13 possible codes involve the wheel-speed sensors. Wheel-speed sensor failures are the most common type of ABS problem being encountered. The speed sensors on our Roadmaster are easy and straight forward to diagnose and service. One the most common tests performed during speed-sensor diagnosis is a resistance test of the sensor coil. The front sensor connectors are located on the top of the frame rail, behind the upper control arm, as shown in Figure 8.
Figure 9 shows how this type of connector usually provides a good seal against the elements. Checking for moisture intrusion and corrosion at connectors is an important part of the diagnostic process. The resistance valve for a front sensor should range between 1015 and 1245 ohms. Our Roadmaster front sensor measured right in the middle at 1144, as shown in Figure 10.
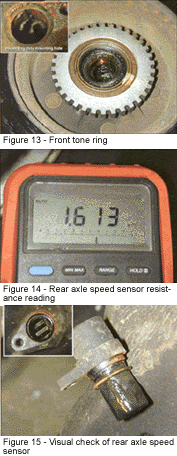
Although not always part of the flowchart, a visual inspection of both the speed sensor and tone ring is usually a good practice to follow. The build up of metal filings shown in Figure 11 could be enough to affect the sensor output and trip a code. This type of build up can be easily cleaned, as shown in Figure 12. The tone ring can be inspected through the sensor mounting hole in the steering knuckle or by removing the rotor (Figure 13). This type of tone ring is not generally exposed to much that could harm it. When replacing rotors, make sure the new rotors not only are equipped with the tone ring, but that it is the same size and has the same number of teeth.
The rear speed sensor is located in the front of the rear differential. Its connector is located on the left-hand frame rail just in front of the tire. The acceptable resistance range for a rear sensor on a Bosch 2U system is from 1470 to 1730 ohms. Figure 14 shows our rear sensor measuring at an acceptable 1613 ohms.
Figure 15 shows the visual inspection process involved in checking the rear speed sensor and tone ring. It was nice to see that even though our example vehicle was six-years old and had lived its entire life in the rust belt, neither sensor was difficult to remove.
While not common on these systems, EBCM and modulator faults can occur. The simplicity of the system enhances service of either the EBCM or BCM. The first advantage comes from access to the unit. Unlike units such as the Bendix 4 where the battery and battery tray have to be removed, access to the Bosch 2U assembly is simple. In our case we had to remove the air intake at one end and push it to one side. The service procedures say the removal of the radiator side of the upper radiator hose is necessary to service or remove the unit. On this vehicle I found this was not necessary.
The following procedure is used to R & R the EBCM. The steps involved in replacing the BCM are the same as the steps involved in separating the EBCM from the BCM with the addition of disconnecting the brake lines. Either process should only take 15 minutes.
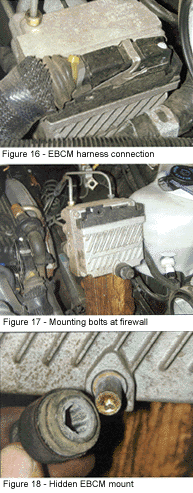
After the necessary clearance is obtained, disconnect the wiring harness connector from the EBCM by pulling up on the lock down lever shown in Figure 16.
Next, loosen, but do not remove, the three mounting bracket bolts. Once loose, wiggle the assembly out of its mounting bracket and support it with a block of wood. The service manual procedures say to unbolt the brake line frame mounting bracket to provide the necessary slack, but I found on this model it wasn’t that necessary. Make the decision based on the condition of the brake lines.
Once the assembly has been supported. remove the EBCM to BCM mounting bolts (Figure 17). There is a "hidden" mounting bolt under the front rubber bracket mount you will have to remove before you can separate the EBCM from the BCM. Simply slide the rubber mounting off the hexagon bolt head to gain access, as shown in Figure 18. After all the bolts have been removed the EBCM can be removed from the BCM (Figure 19). The EBCM on this model is a one piece assembly and cannot be serviced.
Integral parts of the EBCM on this model are the two relays shown in Figure 20. One relay is used to energize the pump motor, while the other one supplies power to the solenoid circuit. In this model, these relays are not serviceable, but older units allow these relays to be replaced individually.
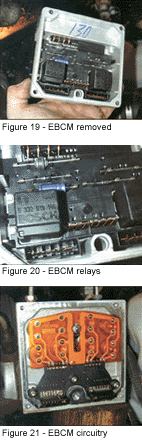
Figure 21 shows the open end of the BCM, which exposes the solenoid pairs for each wheel. This model uses two solenoids per wheel. One to accomplish the pressure hold mode, and the other to perform the pressure decrease mode.
While not part of any flowchart, the solenoid coils can be checked very easily by measuring the resistance across each solenoid. The resistance value for the pressure hold solenoids is 9.3 ohms while the pressure decrease solenoids should measure at 4.9. The difference is due to the fact it takes a stronger solenoid to isolate the pressure than it does to release it. The EBCM cannot be serviced and requires replacement as an assembly. Removing the brake lines would complete the removal process. It is a good practice to cap off the two supply lines from the master cylinder to prevent the system from running dry.
When replacing the BCM it is not necessary to perform any involved bleeding procedures as with other modulators. Once the unit has been installed, bleed the system at each wheel using the correct sequence. The sequence for the RWD models is RR, LR, RF and LF
Unless you know the vehicle very well, you should always consult the bleeding sequence and read any cautions listed.
Bosch 2U system is one of the easier system to diagnose and service. This is especially true of the models not requiring a scan tool for code access.